Installation of a humidistat-controlled extractor fan in a Chacewater kitchen, complete with external venting, dedicated switching, and concealed cabling prepared for decoration.
Moisture control in kitchens can be a persistent challenge for homeowners, particularly in older properties where ventilation wasn’t originally designed to cope with modern cooking habits. When we were contacted by a homeowner in Chacewater about installing an extractor fan in their kitchen, the brief was clear – they wanted a solution that would automatically manage humidity levels whilst blending seamlessly with the existing décor and external finishes of the property.
The installation required a humidistat-controlled extractor fan, which differs from standard fans by incorporating a sensor that monitors moisture levels in the air. Rather than relying on manual switching or simple timers, these units automatically activate when humidity reaches a predetermined threshold, then continue running until the air returns to normal levels. This intelligent operation makes them particularly effective in kitchens where steam from cooking can quickly raise moisture levels, but where remembering to manually switch on ventilation isn’t always practical during the rush of meal preparation.
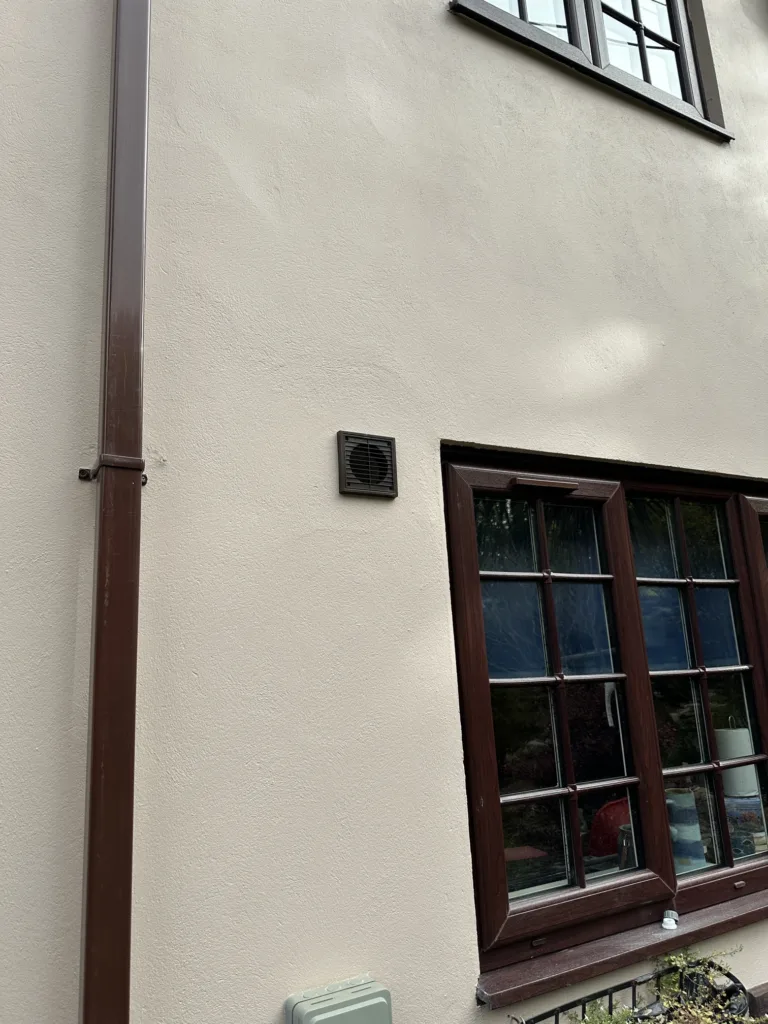
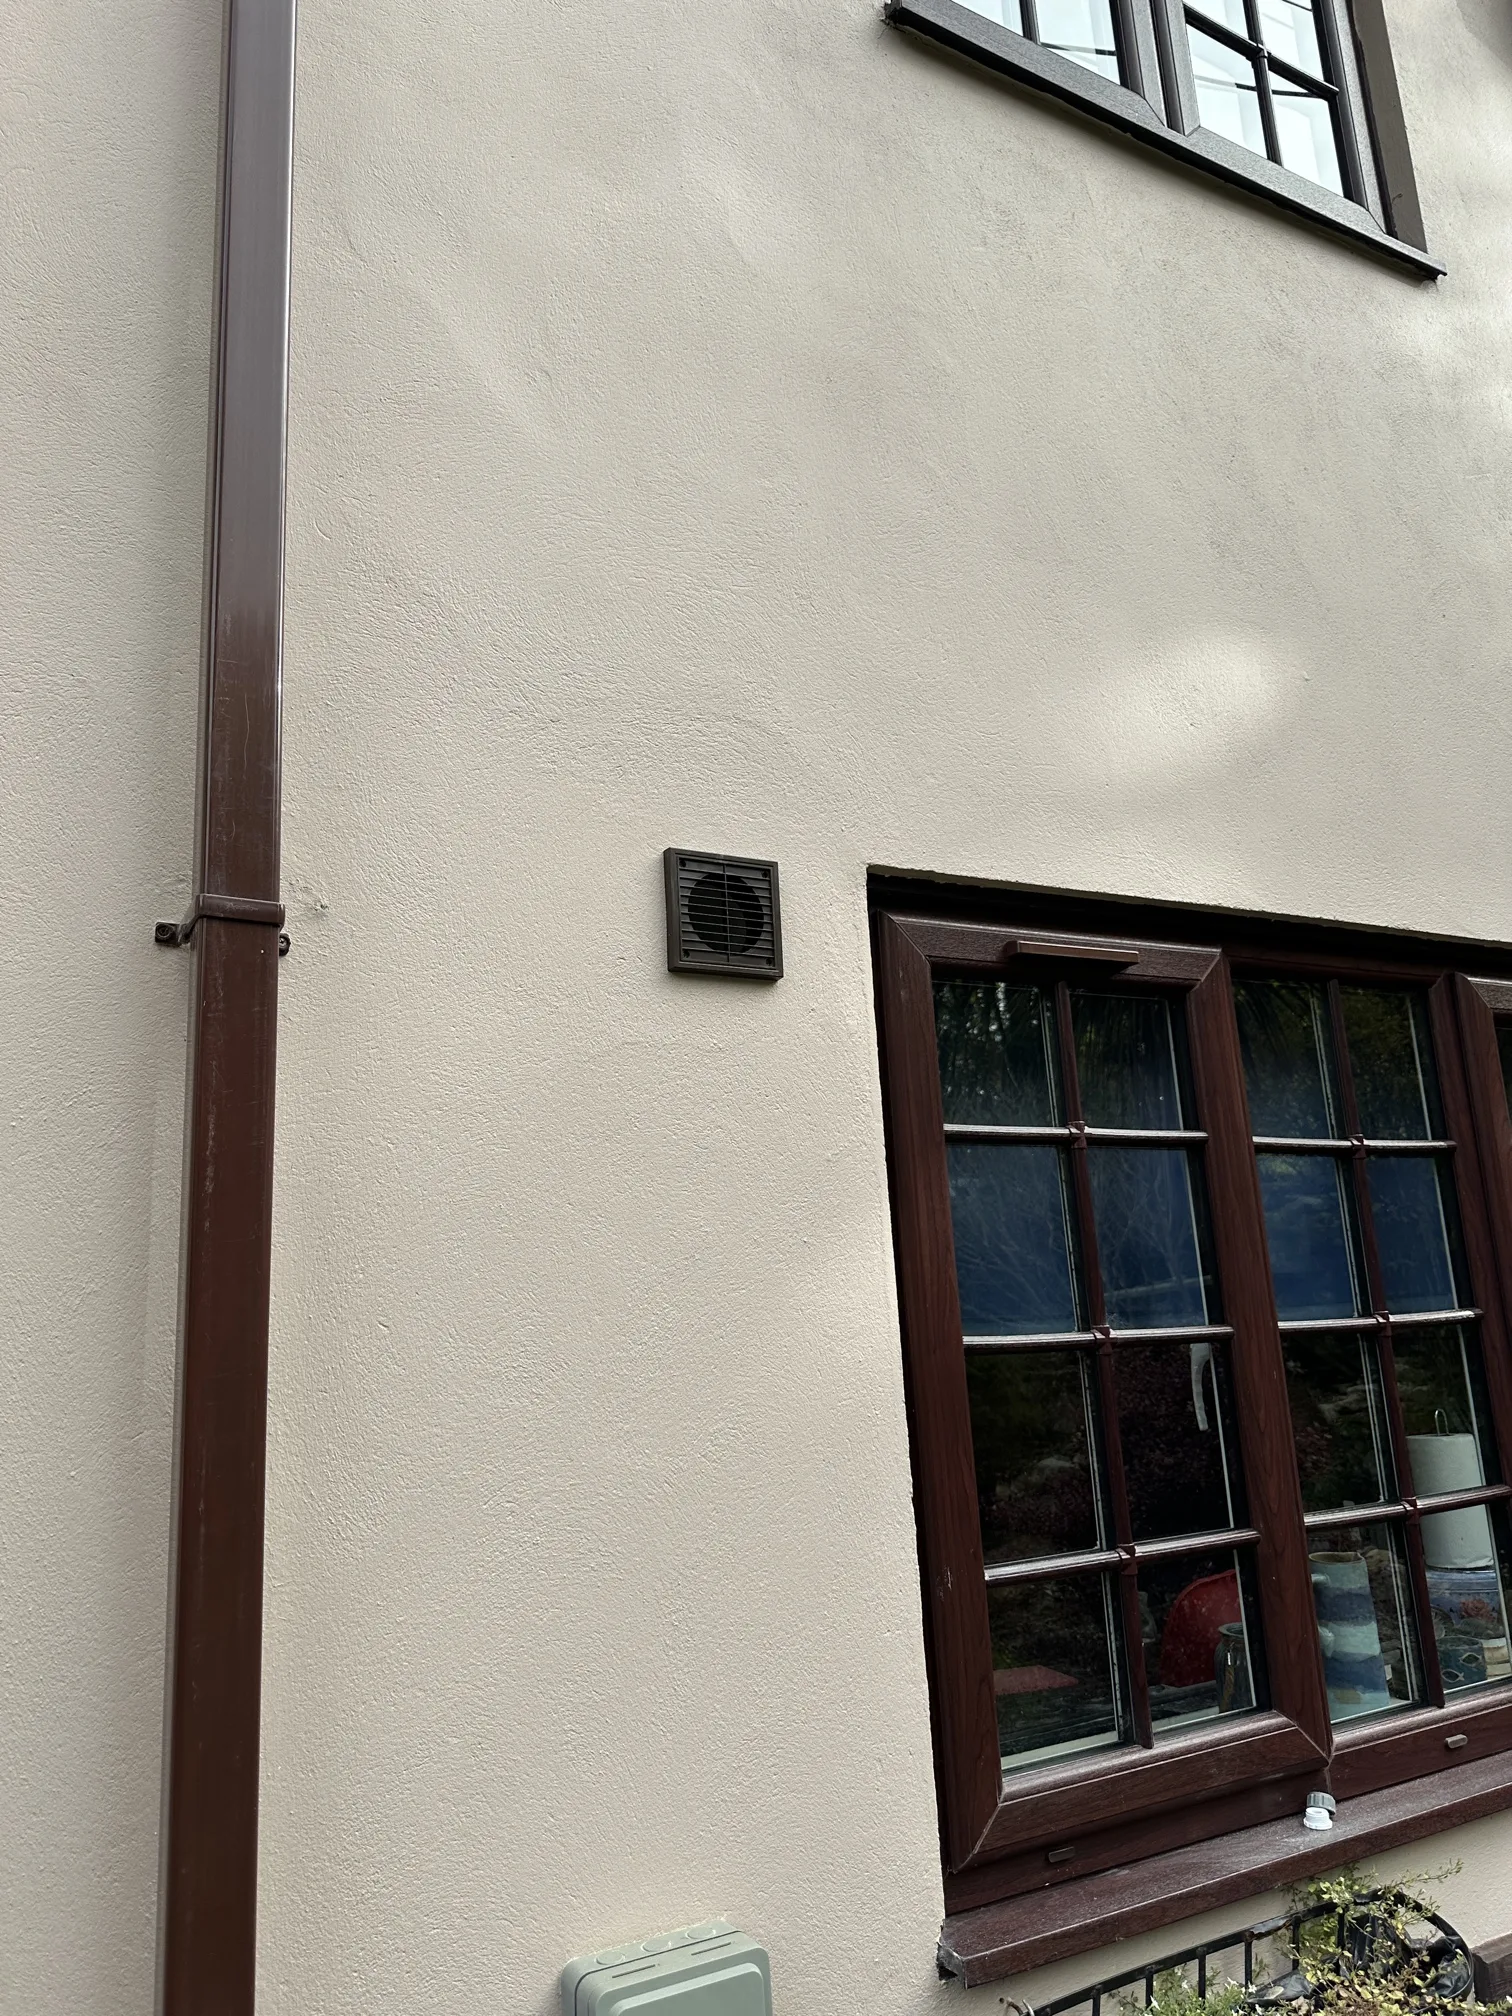
Positioning was the first consideration. The homeowner wanted the fan installed to the right of an existing window, which provided a logical location for external venting whilst maintaining the symmetry of the room’s layout. However, this placement meant we needed to carefully navigate the external obstacles – specifically, the existing drainage pipes and guttering that ran down that section of wall. A 4-inch core drill would be required to create the passage through the masonry, and precision was needed to avoid any contact with these external features.
Before commencing any drilling work, we carried out a thorough assessment of the wall construction and verified the exact positions of external pipework. The last thing anyone wants is a damaged drain pipe or compromised guttering, so taking time at this stage saved potential complications later. Once satisfied with our measurements, we proceeded with the core drilling, working from the internal side through to the exterior. This approach gives better control over the process and allows for real-time adjustments if any unexpected obstacles are encountered within the wall cavity.
The external vent presented an aesthetic consideration that’s often overlooked in ventilation installations. Standard white or grey vents can look incongruous against certain exterior finishes, drawing unnecessary attention to themselves. In this case, the property had brown guttering and downpipes, so we sourced a brown external vent grille to match. It’s a small detail, but these finishing touches make a significant difference to the overall appearance of completed work, particularly on properties where visual consistency matters to the homeowner.
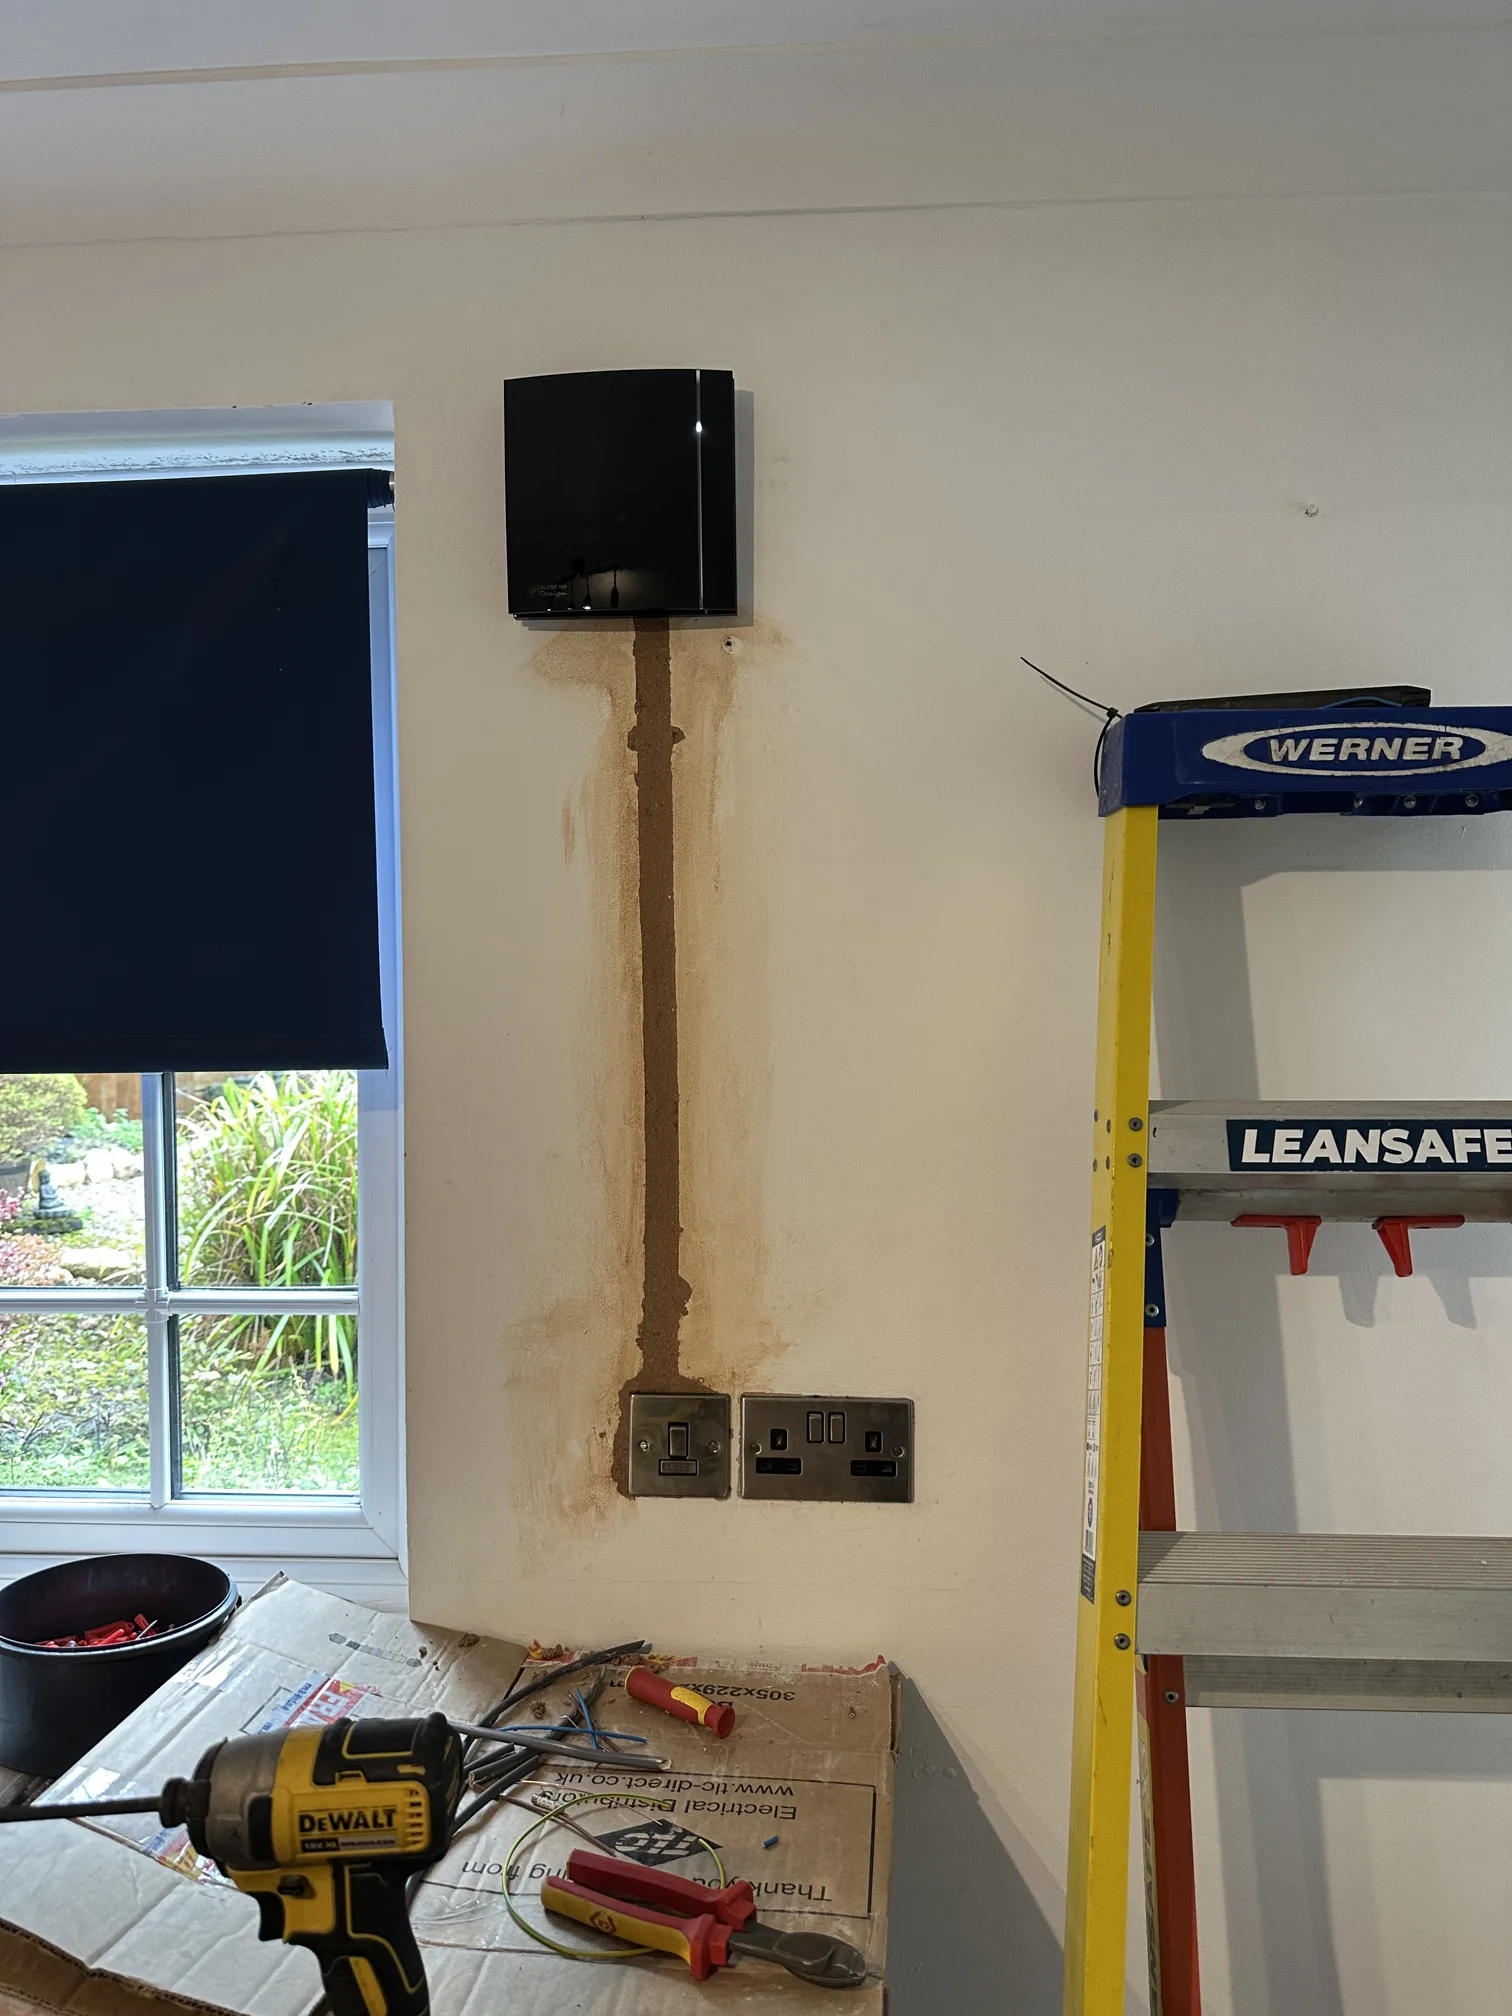
With the core drilling completed and the external vent fitted, attention turned to the electrical supply. The fan required a dedicated connection, and the most practical source was the existing countertop socket outlet. This involved installing a fused connection unit that would provide both isolation and overload protection for the fan circuit. The homeowner wanted this switch positioned adjacent to the existing socket for convenient access, which meant recessing a metal back box into the masonry wall.
Chasing out masonry for back boxes and cable runs is one of those tasks that requires a balance between creating adequate depth for a flush finish whilst avoiding excessive damage to the wall structure. We measured and marked the route for the cable chase, running from the new fused spur vertically up the wall to the fan position. The channel needed to accommodate the circuit cable whilst leaving sufficient depth for the bonding coat plaster that would fill it afterwards.
The decorative fused spur was selected to match the existing outlets in the kitchen and adjacent utility room, maintaining consistency across the space. These small matching details contribute to a professional finish where new installations don’t jar against existing fittings. Once the back box was secured and the cable chase prepared, we ran the circuit wiring, making all necessary connections at both the fan and the fused spur.
Testing formed the next phase of the installation. The humidistat function needed verification to confirm it would activate at appropriate moisture levels. We also checked the electrical connections, tested the isolation provided by the fused spur, and confirmed that the fan operated smoothly without excessive noise or vibration. The brown external vent was inspected to verify it allowed proper airflow whilst preventing backdraught when the fan was inactive.
The cable chase was then filled with bonding coat plaster, providing a smooth surface ready for the decorator who would be following on. Leaving cables exposed or poorly filled channels creates additional work for decorators and can compromise the final finish, so proper preparation at this stage was particularly helpful. The plaster was applied carefully, working it into the chase and finishing it flush with the surrounding wall surface.
For the homeowner, the installation provided several practical benefits beyond simple ventilation. The humidistat function means the fan responds automatically to cooking activities, activating when steam levels rise during boiling, steaming or other moisture-generating tasks. This automatic operation continues after cooking finishes, extracting residual moisture until the air returns to normal humidity levels. The result is better moisture control without requiring manual intervention, which helps protect kitchen surfaces, reduces condensation on windows, and contributes to a healthier indoor environment.
The dedicated switching via the fused spur also provides useful flexibility. Whilst the humidistat handles day-to-day operation automatically, the homeowner can manually override the fan when needed, or isolate it completely using the fused switch if maintenance is ever required. This combination of automatic and manual control offers the best of both approaches – convenience for regular use with the option for direct control when circumstances require it.
Colour-matching the external vent to the existing brown guttering might seem like a minor detail, but it demonstrates attention to the overall appearance of the installation. Properties, particularly those in more traditional settings, often benefit from ventilation solutions that work effectively whilst remaining visually unobtrusive. The brown vent grille achieves this balance, providing necessary airflow whilst blending with the existing external colour scheme.
The location in Chacewater meant we were working in an area where properties vary considerably in age and construction. Understanding local building characteristics helps inform the practical approach to installations like this, from anticipating wall construction types to navigating the external features common to homes in the area. Every property presents its own particular challenges, whether that’s working around existing services, matching specific finishes, or accommodating the preferences of homeowners who value both function and aesthetics in their home improvements.
